Driver Documentation

SimpliPlug CSMS — Driver Guide & Sectional FAQ

Comprehensive user documentation and answers to frequently asked questions for the SimpliPlug charging network.

Note: Features marked with an asterisk (*) are optional features toggled on or off by your organization administrator and may not appear on all accounts.

1. Log In and Authenticate

1.1 Overview & Authentication Options

The SimpliPlug Login Page provides passwordless authentication for drivers and site administrators. To eliminate security vulnerabilities associated with traditional passwords, SimpliPlug relies entirely on secure OAuth and biometric Passkey authentication.
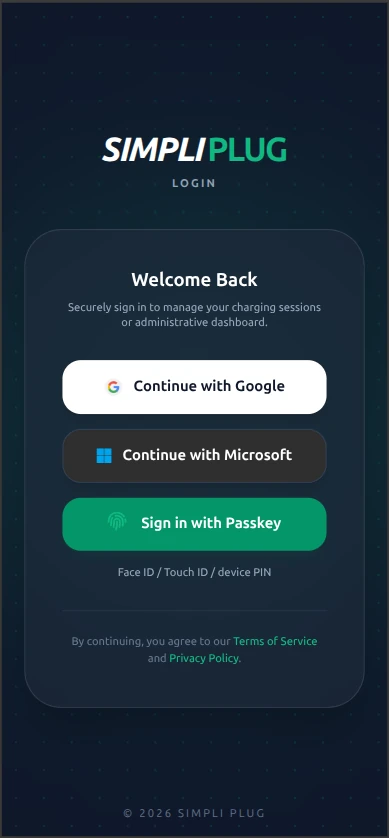
SimpliPlug main login screen showing Google, Microsoft, and Passkey sign-in buttons
Figure 1: Main SimpliPlug Login Interface

Primary Authentication Methods:

  • Google OAuth: Instant sign-in using your existing personal or corporate Google account.
  • Microsoft OAuth: Instant sign-in using your personal, work, or school Microsoft/Office 365 account.
  • Passkey Authentication *: Secure sign-in using device biometrics (Face ID, Touch ID) or your local device PIN. (Availability depends on device compatibility).
1.2 Signing In with Google or Microsoft (OAuth)

OAuth allows you to access SimpliPlug without creating or remembering a new password.

  1. Navigate to the SimpliPlug login page.
  2. Select your preferred account provider:
    • Click “Continue with Google” for Google/Gmail accounts.
    • Click “Continue with Microsoft” for Microsoft/Outlook/Work accounts.
  3. Authenticate with your provider when prompted.
  4. Once authenticated, you will be redirected automatically to your SimpliPlug Dashboard.

Note: SimpliPlug only requests basic profile details (your name and verified email address) from Google or Microsoft.

1.3 Signing In & Registering with a Passkey *

Passkeys offer a fast, passwordless alternative that leverages the built-in security hardware of your smartphone, tablet, or computer (such as Apple Touch ID / Face ID or Windows Hello).

Registering a New Passkey:

Passkey registration is restricted to invited users created by a site host or property manager.

  1. Open your organization's official Group Invite Link or QR Code provided by your administrator.
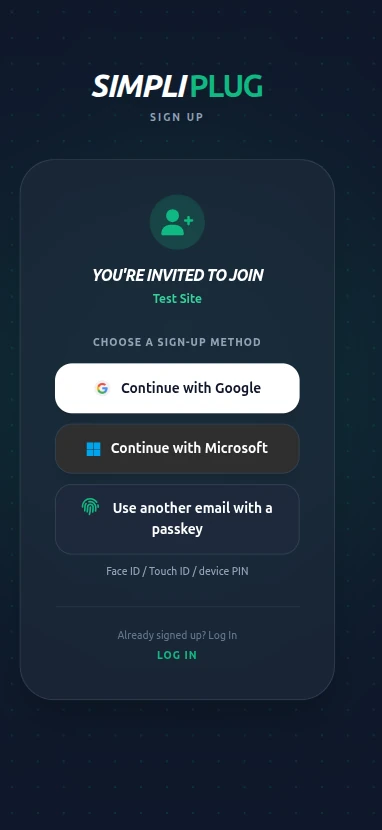
  2. Click “Use another email with a passkey”.
Organization invitation sign-up interface highlighting the Use another email with a passkey option
Figure 2: Organization Invitation Screen
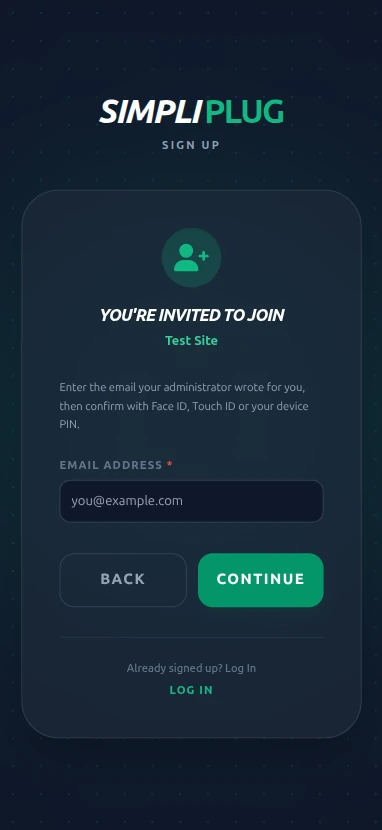
  1. Enter the exact email address registered for you by your property administrator, then click Continue.
Email address prompt modal for invited passkey users
Figure 3: Invited Email Address Verification Modal

(Note: If you enter an unregistered email, a join request will be sent to the administrator for approval).

  1. Follow your browser or mobile device prompts to confirm with Face ID, Touch ID, or your device PIN.

Signing In with an Existing Passkey:

  1. Click “Sign in with Passkey” on the main login screen.
  2. Confirm the biometric or PIN prompt on your device.
  3. Upon successful verification, you are signed in immediately.

Frequently Asked Questions: Log In & Authentication

Q1: How do I log into SimpliPlug?

Your host administrator must first add your email address to an organization and send you an invitation. Once invited, you can log in using your Google or Microsoft account, or via a biometric Passkey (Face ID, Touch ID, or device PIN) if enabled on your device. No password creation is required.

Q2: Why can't I create a custom username and password?

To maximize security and prevent unauthorized access to property charging hardware, SimpliPlug exclusively uses passwordless authentication. This removes the risk of credential theft, weak passwords, or password resets.

Q3: Why do I need an invitation to sign up with a Passkey? *

Passkey registration requires an existing account record created by your property administrator, who will send you a join link or invite QR code. If you have not received an invitation, please request access from your site administrator.

Q4: What should I do if my Passkey is not recognized? *

If your Passkey is not recognized, ensure you are using the same physical device or credential wallet (such as iCloud Keychain or 1Password) where the Passkey was created. Alternatively, you can log in using Google or Microsoft OAuth if that email address matches your profile.

Q5: Is my payment or credit card information stored on SimpliPlug?

No. SimpliPlug never receives or stores your credit card details or bank account credentials. All transactions and wallet balances are processed and held securely by Stripe.

Q6: Which personal details does SimpliPlug receive when I log in?

We only receive your name and verified email address from your chosen OAuth provider (Google or Microsoft), alongside logs of your charging sessions (time, energy delivered, and cost) required to manage property charger access.

2. History Page & Dashboard

2.1 Overview of the History Page

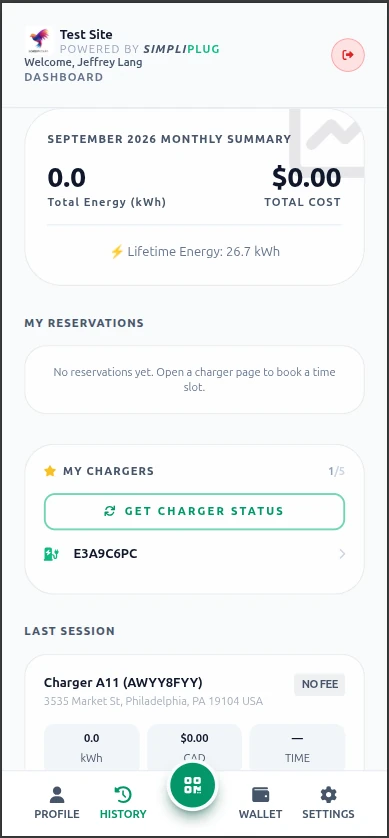
The History Page serves as the default landing page immediately after signing into SimpliPlug. It provides a centralized overview of driver activity, favorite saved chargers, historical usage trends, and itemized transaction logs across the network.

SimpliPlug Dashboard overview displaying monthly kWh summary, saved chargers, and recent charging activity
Figure 4: SimpliPlug Dashboard Overview

Top Navigation Bar & App Installation:

Top navigation header controls showing install app button and log out button
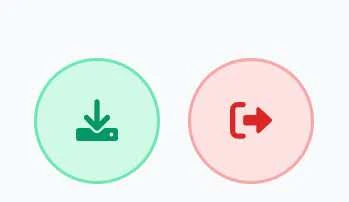
Figure 5: Navigation Header Controls (App Install & Log Out)
  • Log Out Button: Safely signs you out of your SimpliPlug session.
  • App Installation Icon * (Android & PWA-Supported Browsers): On supported mobile browsers (such as Chrome or Edge on Android), an install icon appears in the top navigation bar, allowing you to add SimpliPlug directly to your home screen as a Progressive Web App (PWA).

Add a Website Icon to Your Home Screen (iOS):

You can add a website icon to your iPhone Home Screen for quick access.

  1. Go to the Safari app Safari app icon on your iPhone.
  2. Go to the website you want to add to your Home Screen.
  3. Tap the More button More button icon, then tap Share Share button icon. If your Tabs layout is Bottom or Top, tap the Share button.
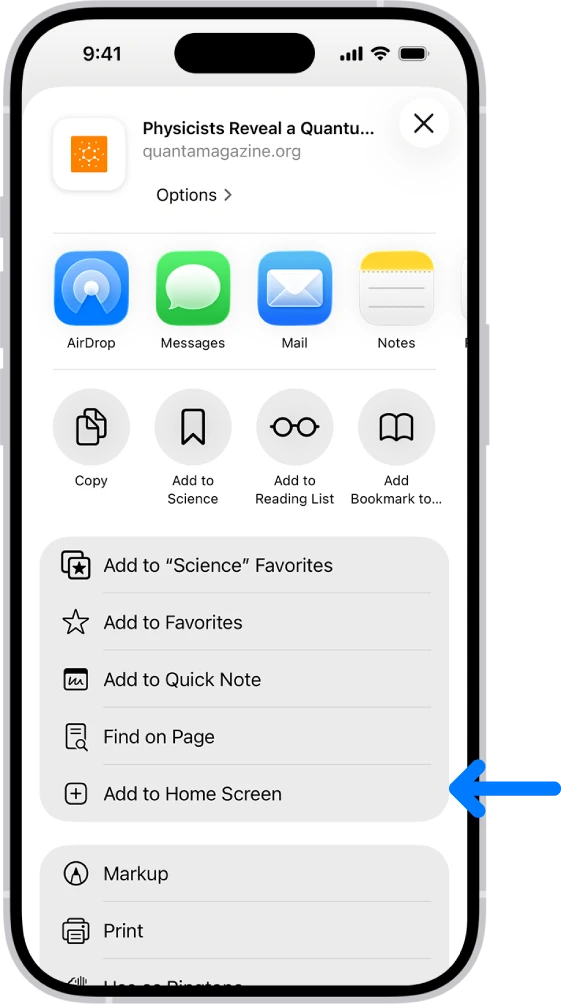
  4. Scroll down the list of options, then tap Add to Home Screen. If you don't see Add to Home Screen, you can add it. Scroll down to the bottom of the list, tap Edit Actions, then tap Add to Home Screen.
  5. You can choose Open as Web App to use the website as if it's an app. See Turn a website into an app.
  6. Tap Add Add button icon.
In Safari, the Share button on a website has been tapped, displaying a list of options, including Add to Home Screen
Figure 6: In Safari, the Share button on a website has been tapped, displaying a list of options, including Add to Home Screen.

The icon appears only on the device where you add it.

Note: Some websites may ask for permission to send you notifications. You can change your notification settings at any time.

Bottom Navigation Bar:

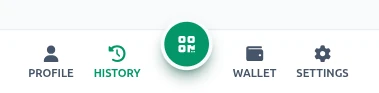
The bottom navigation bar gives you one-tap access to the main areas of the app:

Bottom navigation bar showing Profile, History, QR Scanner, Wallet, and Settings
Figure 7: Bottom Navigation Bar
  • Profile: Your account summary, connected organization, RFID cards, and subscription details (see section 3).
  • History: Your dashboard with usage summaries, saved chargers, and recent sessions (see below).
  • QR Scanner (center button): Opens the camera to scan a charger QR code and start a session (see section 5).
  • Wallet: Your Quota and Wallet balances, top-ups, and transaction ledger (see section 4).
  • Settings: Display name, battery capacity, appearance, language, and organization membership (see section 6).

2.2 Dashboard Modules

Monthly Usage Summary:

Displays high-level aggregate statistics for the current billing cycle alongside your account's lifetime energy consumption:

  • Total Energy (kWh): Cumulative kilowatt-hours delivered across all sessions in the current calendar month.
  • Total Cost ($): Total monetary cost incurred during the current calendar month.
  • Lifetime Energy: Cumulative energy (kWh) consumed across all sessions since account creation.

Favorite Saved Chargers:

Pins your saved charging stations for quick access:

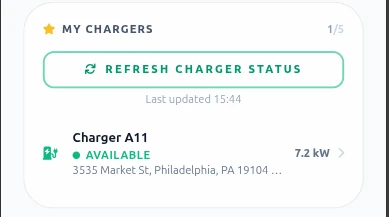
My Chargers module displaying saved station name, power rating, address, and Refresh Charger Status button
Figure 8: Favorite Saved Chargers Module
  • Station Name & QR Code ID: Displays the charger alias alongside the physical sticker code (e.g., Charger A11 (AWYY8FYX)).
  • Power Rating & Address: Displays operational max power output (e.g., 7.2 kW) and physical street address.
  • Action Controls: Displays [Start Session] when the charger is idle or [View Live] when your session is actively charging.
  • Refresh Charger Status: Retrieves the latest real-time availability status for saved chargers.

Latest Sessions & Recent Activity Feed:

Displays recent session activity sorted newest first. Tapping or clicking any session row opens itemized details, including a complete transaction fee breakdown.

2.3 Data Export (PDF & Excel) *

When enabled by your organization's subscription plan, drivers and administrators can export charging history for expense reimbursement or bookkeeping in PDF or Excel formats.

Frequently Asked Questions: History & Dashboard

Q1: How far back can I view and export session records?

Drivers and administrators can view and export historical records for up to 12 months directly through the web app.

Q2: What if the [Export Data] button is not visible? *

Data export capabilities are not turned on by your organization's administrator. This feature depends on your organization's subscription plan tier and feature configuration.

3. Profile Page

3.1 Overview of the Profile Page

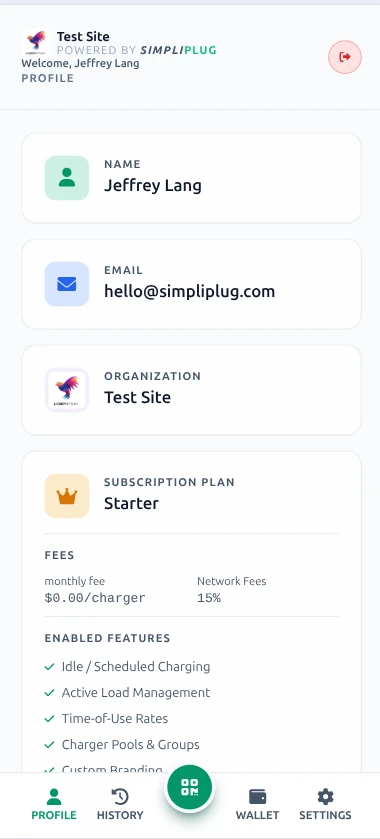
The Profile Page provides a centralized summary of your personal account credentials, assigned host organization, site network capabilities, and registered physical RFID access tokens.

3.2 Account & Organization Summary

Personal Details:

  • Name: Displays your account profile name. (You can update your display name in Settings).
  • Email: Displays your registered login email address.

Connected Organization:

Displays the name and logo of your primary charging host organization. Your organization determines station access, pricing tariffs, and quota eligibility.

3.3 Subscription Plan & Enabled Features *

Outlines active plan parameters and smart management tools enabled by your host site:

  • Fee Structure: Displays the Charging Service Fee.
  • Enabled Capabilities: Indicates active smart features, such as:
    • Idle / Scheduled Charging: Off-peak power management and idle parking time limits.
    • Active Load Management (ALM): Dynamic electrical current balancing across stations.
    • Time-of-Use (TOU) Rates: Variable peak and off-peak pricing schedules.
    • Driver Wallet, Quota, Pay per Session: Payment channels enabled by the host organization.

3.4 Managing Physical RFID Cards & Keys *

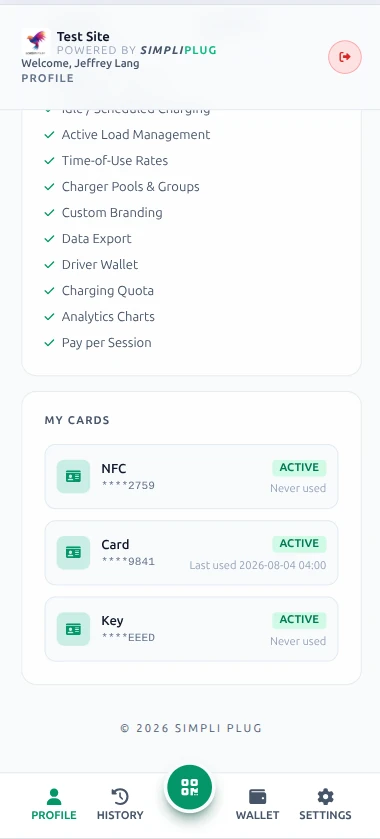
If you have assigned RFID tokens, the My Cards section lists all physical RFID cards and key fobs linked to your account for tap-to-charge hardware access:

My Cards profile section listing assigned NFC tags, RFID cards, key fobs, masked IDs, and active statusesMy Cards profile section continued, listing further assigned NFC tags, RFID cards, and key fobs
Figure 9: Registered Physical RFID Cards & Key Fobs
  • Card / Key Type: Identifies whether the token is a plastic RFID card, NFC tag, or key fob.
  • Masked ID: Displays the last 4 characters of the token's unique identifier (e.g., ****9841).
  • Status: Indicates whether the token is currently Active or disabled.
  • Usage Timestamp: Displays the date and time the card was last tapped at a charger.

Frequently Asked Questions: Profile Page

Q1: How do I change my registered email address or account name?

Update your display name in the Settings tab. To change your primary login email, ask your site administrator to recreate your account under the new address.

Q2: How do I get a new physical RFID card or key fob? *

Physical RFID tokens are issued directly by your site administrator. Once assigned in the admin portal, the token automatically appears under your My Cards list.

Q3: What should I do if I lose my physical RFID card or key fob? *

Contact your site administrator immediately to deactivate the lost token and prevent unauthorized usage of your wallet or quota balance.

Q4: Is the Charging Service Fee charged directly to my personal credit card?

No. The Charging Service Fee charged by SimpliPlug is automatically factored into station pricing rates or handled at the host organization level. The rate displayed on screen is the final price you pay.

4. Wallet Page & Payments

4.1 Overview of the Wallet Page

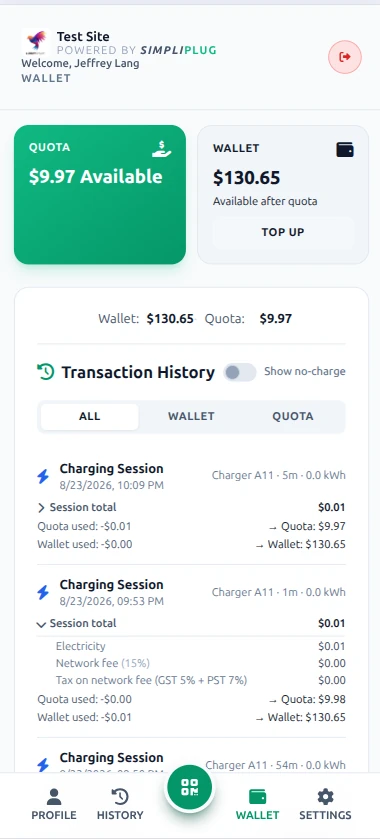
On the Wallet Page, you have access to one or more payment methods including: quota, wallet, pay per session. You can view the balance in quota or wallet, and inspect detailed transaction histories and fee breakdowns.

Wallet Page overview showing Quota, Wallet, and Pay per Session payment method cards with balances
Figure 10: Wallet Page Overview

4.2 Understanding Your Balances

1. Quota *:

  • What it is: An allowance or credit balance assigned directly by your site administrator (e.g., employer subsidy, property perk, or offline payment credit).
  • How it works: Selectable as a payment method during session start. The app automatically remembers your preference (Quota vs. Wallet) for future sessions.
  • Key Indicators:
    • Available Amount: Remaining subsidy balance.
    • Renewal / Expiry: Date when your balance resets or expires (if configured by admin).
    • Disabled Status: Indicates if your site operator has not enabled quota access for your account.

2. Wallet (Personal Prepaid Balance) *:

  • What it is: Personal funds deposited directly using a credit or debit card.
  • How it works: Used to pay per session when selected at checkout.
  • Key Action: Tap [Top Up] to expand the payment form and add funds to your account.

3. Pay Per Session (Direct Card Payment) *:

  • What it is: A direct single-session payment option using a credit or debit card without requiring pre-funded wallet deposits.
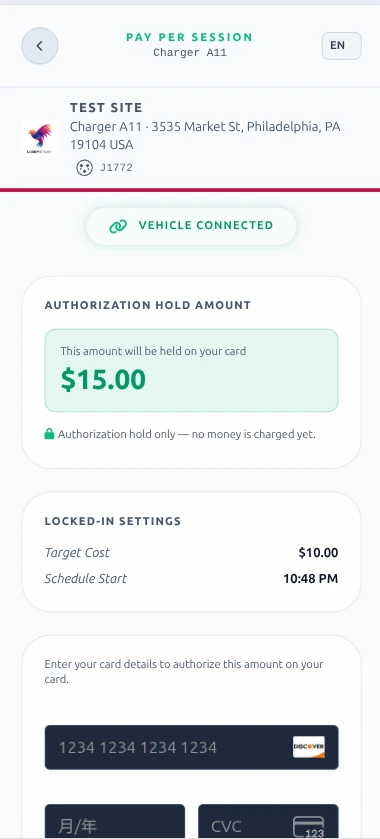
  • How it works: A temporary authorization hold is placed on your card at session start. Upon completion, the exact session cost is settled, and any remaining hold amount is immediately released.
Pay Per Session authorization hold screen indicating temporary $15.00 card hold
Figure 11: Pay Per Session Authorization Screen

4.3 Adding Funds to Your Wallet

  1. Tap [Top Up] on your Wallet card.
  2. Select Amount: Tap a quick-select button ($10, $25, or $50) or enter a custom value (minimum 5.00, default maximum 100.00).
  3. Review Fee Breakdown: Check the estimated net balance credited to your account.

    About Stripe Processing Fees: Payment processing is handled by Stripe (a secure third-party payment provider). A standard transaction fee (typically around $0.30 + 2.9%, depending on card type and region) is charged directly by Stripe and deducted from your top-up amount every time a card is processed. Topping up a Wallet balance for multiple sessions avoids recurring per-session fees. For details of Stripe pricing, see https://stripe.com/en-ca/pricing#standard-pricing

    Important: SimpliPlug does not collect or retain this processing fee. If you request a refund for unused wallet funds, Stripe processing fees are non-refundable.

  4. Enter Card Details: Input your credit card number, expiration date, and CVC into the encrypted payment form.
  5. Confirm: Tap [Add Funds]. Funds are processed securely via Stripe and credited immediately.

4.4 Transaction & Session History Ledger

Filtering Ledger Records:

  • [All]: Displays every transaction (top-ups, quota usage, and wallet payments).
  • [Wallet]: Filters to personal top-ups and wallet-funded charging sessions.
  • [Quota]: Filters to sessions covered by organizational allowances.
  • [Show no-charge]: Toggle switch to display or hide zero-cost ($0.00) or short test sessions.

Session Itemization:

Tap any transaction row to open an itemized receipt showing:

  • Energy Usage: Total energy consumed (kWh).
  • Fees: Applicable processing, time, or idle fee penalties.
  • Deduction Source: Specific balance deducted (Quota vs. Wallet vs. Pay per Session).

Frequently Asked Questions: Wallet & Payments

Q1: Which balance gets charged when I start charging?

You select whether to charge using Quota or Wallet before starting. The system remembers your last chosen payment preference and defaults to it until manually changed.

Q2: What if I don't see the Quota, Wallet, or Pay per Session card on my screen? *

Availability depends on your site host's configuration. At least one option is available.

Q3: What are the minimum and maximum top-up limits?

The platform enforces a default minimum top-up limit of 5.00 and a default maximum of 100.00 per transaction. The maximum default can be changed by an organization administrator.

Q4: Why do some completed sessions show as "$0.00" or "No Charge"?

Sessions record as "No Charge" if they end within a very short duration (e.g., under 2 minutes) or if total energy delivered falls below the site administrator's minimum billing threshold (e.g., under 0.5 kWh).

Q5: Is my credit card information stored on SimpliPlug servers?

No. All card processing is handled directly through Stripe's encrypted payment network. SimpliPlug never stores raw credit card details locally.

5. QR Code Scanner

5.1 Overview & How to Scan a Charger

The QR Code Scanner allows you to scan the official SimpliPlug QR code sticker attached to a charger to access station details and start a session.

Instructions:

  1. Tap the QR Scanner icon from your dashboard or browser navigation.
  2. Grant Camera Access: When prompted by your mobile browser (Safari, Chrome, etc.), select Allow.
  3. Align Code: Center the physical QR code sticker within the on-screen viewfinder box. Once recognized, scanning automatically pauses and opens the station's [Start Session] screen.

Frequently Asked Questions: QR Code Scanner

Q1: Can I use another app to scan the QR code?

Yes. Scanning the physical QR code with your smartphone camera or any standard QR reader will open the station page directly in your web browser.

Q2: Why does the scanner report an invalid QR code on an active station?

Make sure you are scanning the primary official SimpliPlug QR Code label attached to the charger's front or side housing. The scanner will refuse any other QR codes.

6. Settings Page

6.1 Overview of the Settings Page

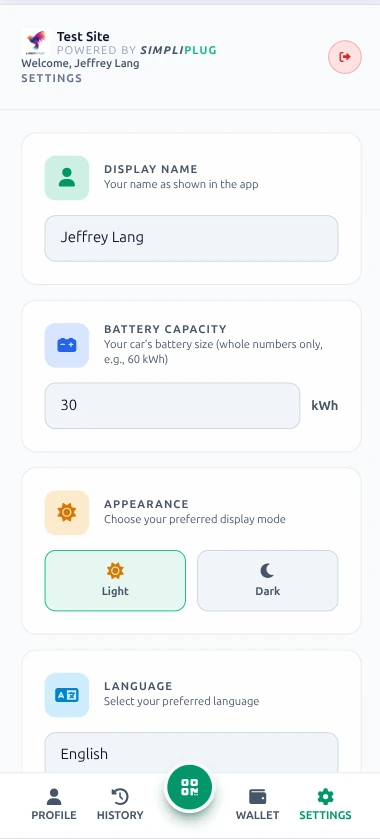
The Settings Page allows you to update your profile details, vehicle specifications, interface appearance, language preferences, connected organization membership, and access customer support resources.

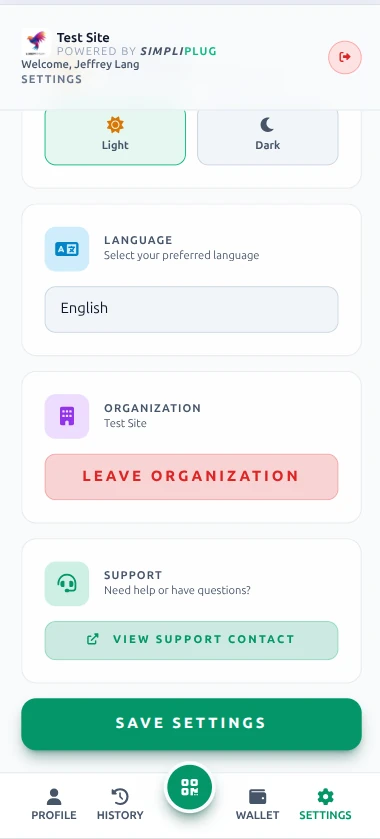
Settings Page top section showing display name, vehicle battery capacity, appearance, and language preferencesSettings Page bottom section showing organization membership and support contact options
Figure 12: Settings Page

6.2 Personal & App Preferences

  • Display Name: Updates your display name visible to site administrators and on itemized transaction receipts. Enter your full name into the Display Name text field.
  • Vehicle Battery Capacity (kWh): Enables the system to calculate estimated battery remaining time required to complete active sessions. Enter your vehicle's total usable battery capacity as a whole number in kilowatt-hours (e.g., 57 kWh).
  • Appearance & Language:
    • Appearance: Toggle between Light and Dark modes.
    • Language: Select your preferred display language (English, 中文, Français, Español).
  • Saving Changes: Tap the green [Save Settings] button at the bottom of the form to apply changes. Unsaved changes will be lost if you navigate away.

6.3 Managing Organization Membership

The Organization Card displays your currently connected EV host site. To disconnect your driver account from your current site host, tap [Leave Organization].

Prerequisites & Rules:

  • Stop Active Sessions: You cannot leave an organization while actively charging. End all active sessions before proceeding.
  • Loss of Privileges: Unsubscribing revokes member access rates and site-specific charging privileges.
  • Quota Forfeiture: Any remaining organizational Quota balance is non-transferable and permanently forfeited.

Handling Remaining Personal Wallet Funds:

If you have personal funds remaining on your Wallet Card:

  • Option A (Refund): Tap [Refund Wallet] within the prompt to request a return of unused personal funds.
  • Option B (Forfeit): Tap [Forfeit Balance] and type FORFEIT in the confirmation popup to surrender remaining personal funds.
  • Zero Balance (0.00): If your wallet balance is 0.00, type LEAVE in the confirmation prompt to exit.

6.4 Customer Support Access

Scroll to the Support Card and tap [View Support Contact] to view contact emails, phone numbers, and help documentation provided by your site operator and SimpliPlug support.

Frequently Asked Questions: Settings

Q1: Why should I enter my vehicle's usable battery capacity?

SimpliPlug combines your battery capacity (kWh) with real-time station power delivery metrics to calculate charge percentage estimates and completion time countdowns during active sessions.

Q2: What happens if I close the browser without tapping "Save Settings"?

Any edits made to your Display Name, Battery Capacity, Theme, or Language will not be saved until you tap [Save Settings].

Q3: Why am I getting an error when trying to leave my organization?

You cannot leave an organization while a charging session is running. Stop the active session from your Dashboard or Live Session view first, then return to Settings.

Q4: Can I transfer my Quota or Wallet balance to another organization?

No. Quota allowances are granted by specific site hosts and cannot be transferred. Personal Wallet funds should be refunded via [Refund Wallet] prior to leaving your site host.

7. Charging Process

7.1 Overview & Charging Lifecycle

There are 5 stages in the SimpliPlug charging process:

  1. Start Charging Page
  2. Vehicle Connection & Preparing State
  3. Payment Authorization Hold (for Pay Per Session)
  4. Active Live Charging
  5. Finishing & Charge Complete

7.2 Step 1: Start Charging Page

Access this page by scanning a station QR code or selecting a saved station from your dashboard.

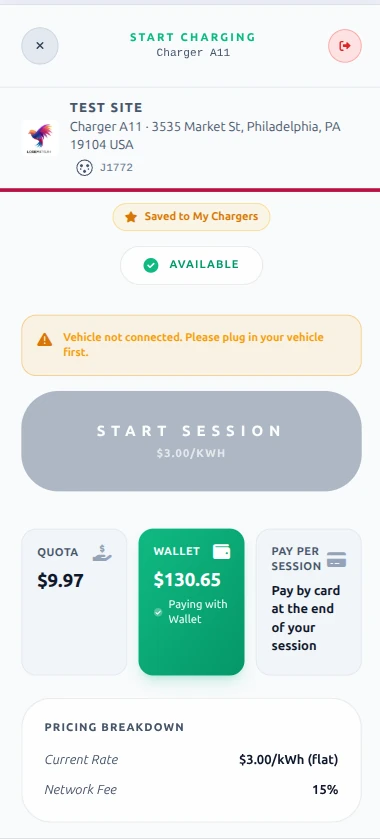
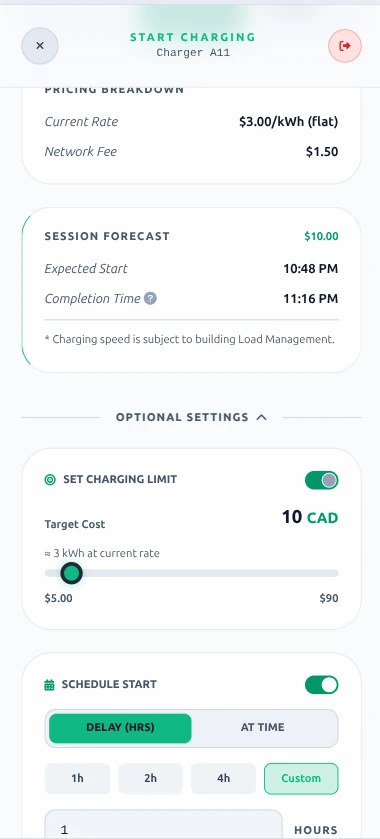
Start Charging screen showing charger details, payment source options, and pricing breakdownStart Charging screen continued, showing optional pre-session configurations and the start control
Figure 13: Start Charging Setup Screen

Station & Hardware Details:

  • Header: Displays site name, logo, charger name (e.g., Charger A11), street address, and plug type (e.g., J1772, CCS, NACS).
  • Saved Chargers: Tap [Saved to My Chargers] to pin (maximum 5 saved stations). Pinning a 6th station removes the oldest saved charger.

Payment Source Selection:

Payment SourceHow It Works
Quota *Topped up by organization admin; no card processing fee.
Wallet *Topped up by driver’s own debit or credit card; card processing fee charged by Stripe.
Pay Per Session *Direct credit/debit card charge via Stripe through pre-authorization hold. Card processing fee applies.

Pricing Breakdown & Session Forecast:

  • Current Rate: Active tariff (e.g., $0.30/kWh flat or Time-of-Use rate).
  • Charging Service Fee: SimpliPlug's fee for the charging service, applied as an electricity mark-up or a network fee.
  • Idle Fee: Penalty for occupying a charger after charging stops (e.g., $5.00/hour after a 30-minute grace period).
  • Session Forecast: Real-time start and completion time estimates calculated based on full vehicle battery charge (configured in Settings) and charger speed (kW). (Note: Level 2 chargers do not have two-way communication to read actual real-time battery state-of-charge from the vehicle).

Optional Pre-Session Configurations *:

  • Set Charging Limit: Stop charging automatically when reaching a set Target Cost ($).
  • Schedule Start: Set a start delay or specific start time (e.g., 11:30 PM) for off-peak rates.

(Note: Both of the above features are subject to your organization administrator turning them on).

7.3 Step 2: Vehicle Connection & Preparing State

The system verifies physical cable connection before starting energy transfer.

  • "Available" Status: Cable is unplugged. The [Start Session] button is disabled with prompt: "Vehicle not connected. Please plug in your vehicle first."
  • "Vehicle Connected" Status: Cable is attached. Status changes to pulsing green Vehicle Connected, enabling the [Start Session] button.

7.4 Step 3: Pay Per Session Authorization Hold *

A temporary pre-authorization hold (e.g., $15.00) is placed on your card before charging begins. To prevent overshooting your pre-authorized limit, charging automatically stops as your running session cost approaches the hold amount. Because of this built-in safety buffer, your final charge will naturally be slightly lower than the total hold amount. Upon completion, you are billed only for the exact energy delivered, and any unused hold funds are immediately released.

7.5 Step 4: Active Live Charging Page

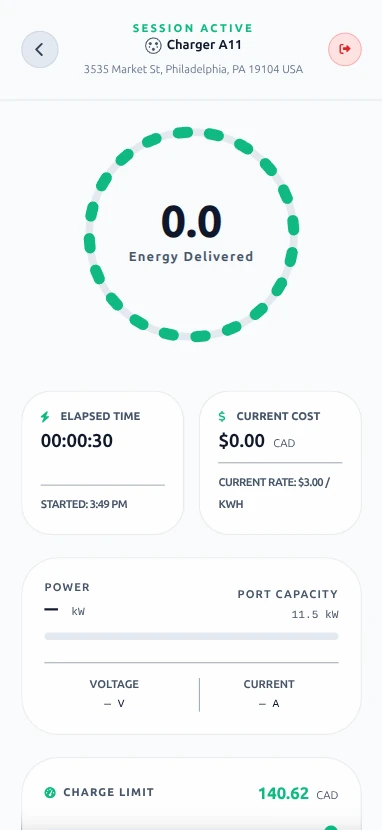
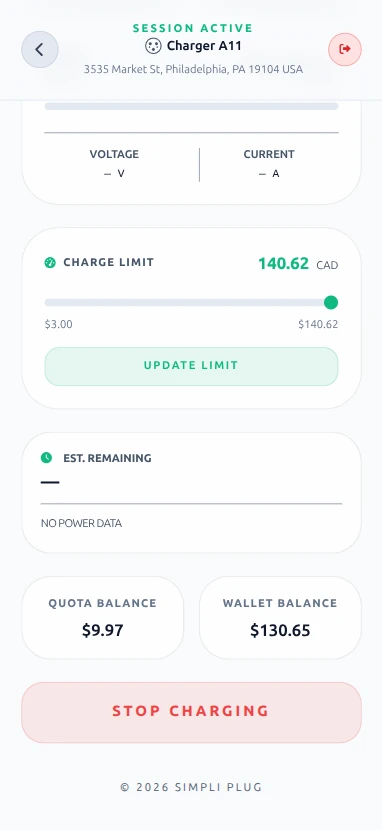
Live charging session just started, showing zero energy delivered, elapsed time, and current costLive charging session just started, showing the charge limit slider, balances, and stop charging button
Figure 14: Live Session — Just Started
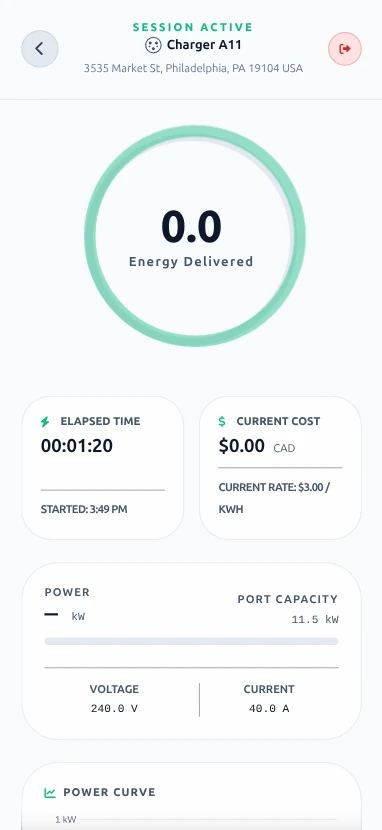
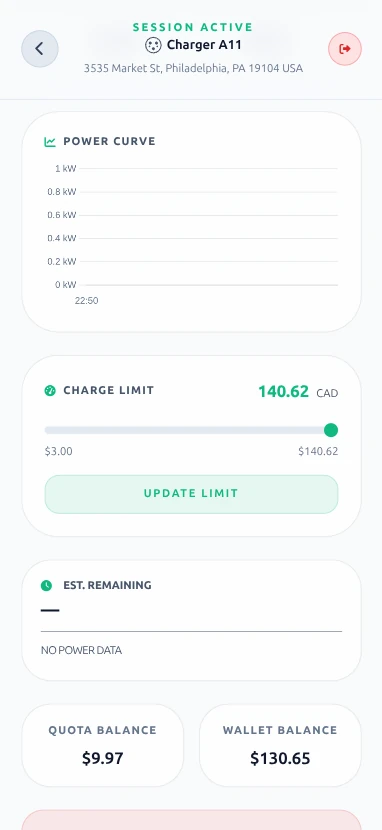
Live charging session with active telemetry showing the energy gauge, elapsed time, voltage, and current drawLive charging session telemetry continued, showing the power curve chart
Figure 15: Live Session Telemetry Dashboard

Primary Metrics Displayed:

  • Energy Gauge: Live delivered energy (kWh).
  • Session Stats: Elapsed time (hh:mm:ss), current cost ($), and current charge rate (kWh).
  • Power Output (kW): Live power rate and port capacity rating.
  • Voltage (V) & Current (A): Line voltage and current draw.

Live Charge Limit Adjuster *:

You can dynamically change the monetary limit during a session. Drag the Charge Limit slider and tap [Update Limit] to adjust spending caps mid-session.

Remaining Time Calculation:

Remaining time estimates are calculated based on achieving a full battery charge or reaching the target cost limit at the current charging rate.

7.6 Step 5: Finishing & Charge Complete State

Charging stops automatically when monetary target limits are reached, current draw drops below a cutoff threshold (6A or 12A depending on admin configuration), or when manually stopped by the driver.

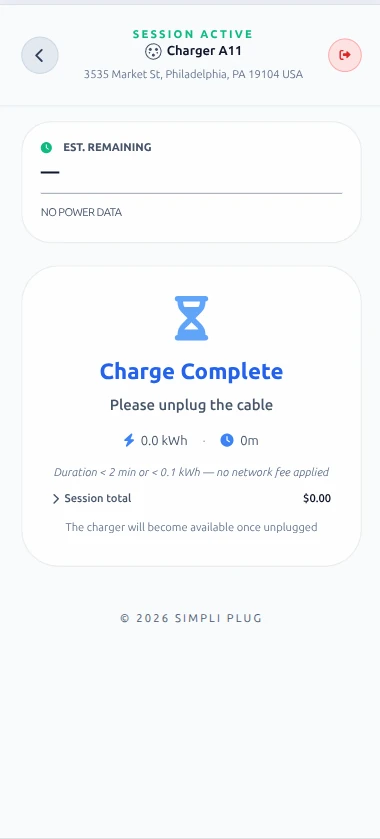
Charge Complete screen prompting driver to unplug cable and displaying itemized session total
Figure 16: Charge Complete & Unplug Prompt Screen
  • Displays prompt: "Charge Complete — Please unplug the cable".
  • Releases physical cable lock on applicable hardware.

Short Session Exemption:

Sessions lasting under 2 minutes OR delivering under 0.1 kWh incur no charge. (Default threshold quantities can be changed by organization admin).

Session Summary Breakdown:

Tap Session Total to inspect cost breakdown:

  • Electricity: Base energy cost (kWh × Rate).
  • Charging Service Fee: Service fee charged by SimpliPlug.
  • Idle Fee: Parking penalty fees accrued post-charging.

Automatic Exit:

Unplugging the cable updates station status to Available and redirects back to the dashboard.

Frequently Asked Questions: Charging Process

Q1: Why is "Start Session" disabled?

Your vehicle must be physically plugged into the charger first.

Q2: How does the Pay Per Session card hold work? *

A temporary pre-authorization hold (e.g., $15.00) is placed on your card. Upon finishing, you are billed only for actual energy consumed, and any unused hold funds are released.

Q3: What happens when I hit my Target Cost limit? *

SimpliPlug sends an automated remote stop command to the charger when the limit is reached.

Q4: Can I adjust my spend limit while charging? *

Yes. Move the slider on the charging screen and tap [Update Limit].

Q5: Why does my session show 0.00?

Sessions under 2 minutes or 0.1 kWh are classified as short starts and billed at no charge.

Q6: What does "Suspended" status mean?

Power flow is paused because your vehicle's battery management system (BMS) paused intake, your battery is fully charged, or the system decided to reallocate capacity to other chargers.

Q7: Why must I unplug after charging finishes?

Unplugging notifies the system that the charger is free for other drivers and stops idle fee accumulation.

© 2026 SimpliPlug Technology. All rights reserved.